Project Objectives
Develop visual understanding of the Element of Design Value.
Develop painting skills.
Intentionally create depth by using Broad Value Range.
Project Description
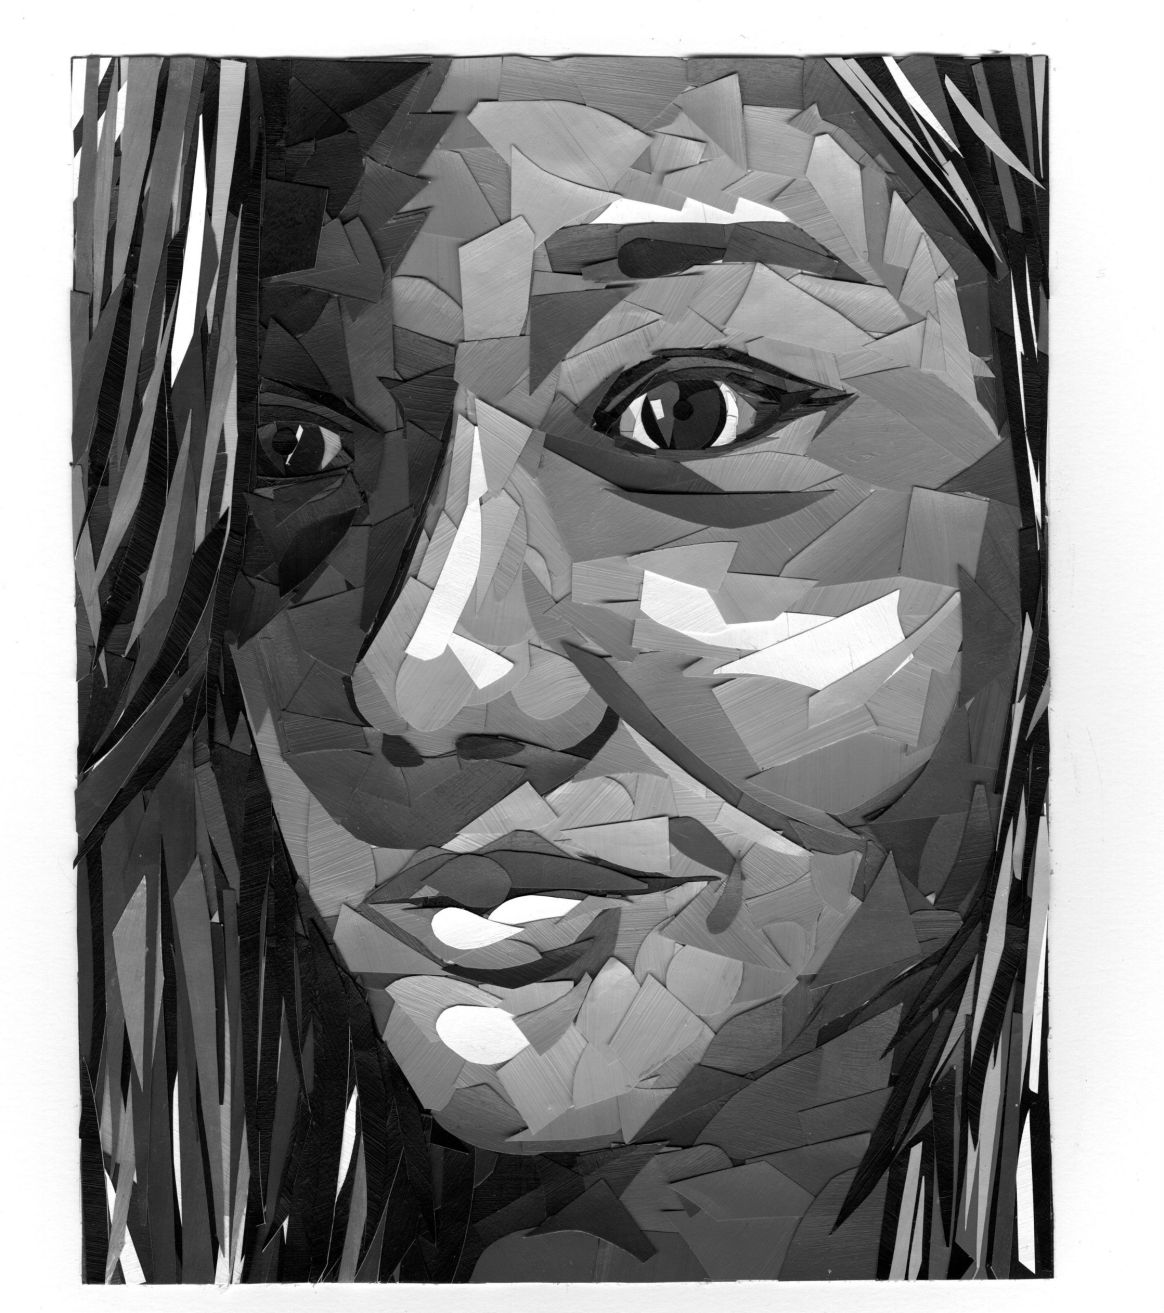
In this project we will use a Subject Matter: YOU focusing on Form to explore how Value evokes a sense of depth.
Required Materials
8”x10” Photo Five (5) Sheets of 9" x 12" Drawing Paper One (1) Sheet of 8" x 10" Tracing Paper 14” x 17” Bristol Board White Acrylic Paint Black Acrylic Paint Paint Brushes Mixing Palette Container for Water Cloth Rag HB Pencil Eraser Scissors Xacto Ruler Glue Stick Rubber Cement
Step-by-step Directions
Part 1
Step 1: Create a value scale to use as a reference.
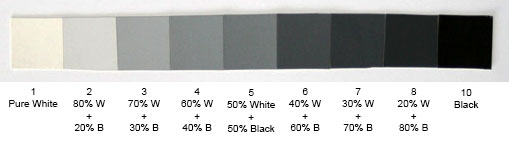
On a sheet of drawing paper, create a nine step value scale using your paints:
Start by drawing in pencil with a ruler a 9" x 1" rectangle and dividing it into nine (9) even 1” squares.
The first value should be painted pure white (1), the last should be painted pure black (9).
Apply an even and smooth coat of pure white paint on the first square (1).
Apply an even and smooth coat of pure black paint on the ninth square (9).
On your palette, mix the same amount of pure white with black. Apply an even and smooth coat of paint on the middle value (5).
Paint the remaining four values by mixing white and black according to the sample below.
Let it dry.
Cut the Value Scale with a ruler and Xacto knife and write your name in the back.
Step 2: Create the tints and shades for your project:
Fold three (3) sheets of drawing paper in thirds and cut the paper in the fold with a ruler and Xacto knife.
Following the guidelines for the Value Scale you created in Step 1, smoothly and evenly paint each third of the paper one of the values from your value scale.
Allow to dry.
Part 2
Step 3: Take a B&W selfie where your face occupies at least 80% of a 8" x 10" field. Make sure the image is in high resolution. Crop it or desaturate it in Photoshop if needed.
Step 4: Print your self-portrait.
Step 5: Place tracing paper over the printed self-portrait and using a mechanical pencil contour the photograph's different values. Your image should have nine (9) different value references - white, black and shades shades in between - in your contour mapping. Be sure that the values are accurately separated and not reduced to too few values for reproduction.
Step 6: Match the Value Scale you created in Step 1 over each of your photograph values to analyze and define the corresponding values to be used. Match the value scale with your contour mapping by labeling the shades in the contour mapping from 1 to 9 according to the original shades.
Step 7: Once you are done contouring all the different values use a thin pen (ultrafine or fine tip sharpie, similar felt tip or ballpoint pen). The contours should have a consistent line quality.
Step 8: Ground the back of the tracing paper - Contoured Self-Portrait - with a smooth layer of charcoal or graphite.
Step 9: Cut down the sheet of 9" x 12" Drawing paper to the same area size as the Contoured Self-Portrait print area (which should be 8" x 10").
Step 10: Using Artist tape, tape the cut down to 8" x 10" drawing paper onto a sturdy surface, and tape the Contoured Self-Portrait over it ensuring that neither moves.
Step 11: Trace the contour drawing on the cut down to 8" x 10" drawing paper with a mechanical pencil.
Part 3
Step 12: Using the scissors cut each value you painted into small imperfect shapes, varying in size and shape. Set them aside separated by value in individual containers.
Step 13: Place the cut values/shapes on your 8" ×10" drawing paper so they will correspond with the original values in your photograph.
Make sure you match the values.
Use your scissors to make any edits to your pre-cut shapes that you need.
Don’t worry if you feel a value is incorrect, you can always edit it later by placing another value on top.
Use the numbered contour mapping as tool to ensure that you are placing each value in the correct place.
Use glue stick to glue down each shape.
If done correctly, there should be no areas of your paper left uncovered.
To ensure that your background looks unified, use shapes in this area as well.
Do not outline facial features or other areas.
Each area of the face should be broken down into flat planes (shapes of value).
Allow for shapes to overlap one another.
If you accurately copy each shape and value, your self portrait should be very close to your photograph.
Step 14: Once your portrait is complete, mount it on the 14”x17” piece of bristol board using your rubber cement glue. Make sure the drawing is centered; use your ruler to create guidelines with pencil before gluing.
Project Considerations
Is the portrait occupying the whole area of the composition?
Has a broad value scale been established?
Are all 9 values from your value scale present?
Does the portrait break each value into a flat plane?
Have you avoided outlining facial features?
Has the final design been executed in a professional manner?
Was the drawing paper cut properly (straight and even sides)?
Are the value paints painted with an even and smooth coat?
Were the value pieces glued with care and without smudges?
Are the design Designs should utilize the designated materials with care, effort, and attention to detail. This includes proper mounting to Bristol Board.
CRAFTSMANSHIP is extremely important for each of your designs and is part of the grading criteria. Do not fold, bend, crease, smudge, tear your artworks! Always take great care when creating each design and then put directly into your portfolio case.
What is Craftsmanship? Care in construction and finishing; demonstration of skill and knowledge of processes; attention to detail. The quality of design and work shown in something that is made by hand.
Project Delivery
Printed Photograph.
Drew contour mapping over Photograph.
Painted the Value Scale.
Painted the value panels.
Cut the value panels in small chips.
Properly glued down the value chips.
Presented final composition mounted on Bristol board.
Grading Criteria
This project is worth 7 points.
Project's Grade Rubric
Craftsmanship: Has the final design been executed in a professional manner? Cut, Glued, Pasted. Even and clean brush strokes. Clean borders.
Materials: Does the design utilize the designated materials with care, effort, and attention to detail?
Black & white Acrylic paint, 8x10 inch paper and Bristol board.
No areas without collage.
Design utilizes the appropriate papers, paper sizes and pens.
Composition: Does the portrait occupy at least 80% of the composition?
Do the values match the original images?
Elements of Design: The design has nine (9) distinct values in the composition.
A broad value range been established in the collage.
Principles of Organization: The portrait breaks each value into flat planes and shows no intentional outlines.
Illusion of Depth: The placement of all shapes and values follow the original image to maintain the facial proportions and create illusion of depth.
Value Scale: Was the value scale neatly created and used following the specified requirements?
Related Presentations
Project 7 | Brightspace